Getting started
Quickstart
The fastest way to get a working Qristal installation is to run it directly from the provided Docker image.
To learn how to use Qristal, let’s run a simple Python example to create a Bell state.
The Bell state is the simplest example of a maximally entangled state, and comprises just 2 qubits. These 2 qubits contribute a Hilbert space of dimension 4. In the qubit basis \(\ket{0}\) and \(\ket{1}\), these four components are written as
A Bell state can be constructed through the application of simple gates such as the Hadamard, X, Z and CNOT gates. Each of the above components are created through their respective circuit:
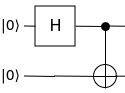
Circuit to create \(\ket{\Phi^+}\):
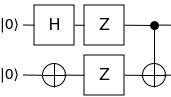
Circuit to create \(\ket{\Phi^-}\):
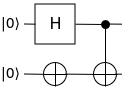
Circuit to create \(\ket{\Psi^+}\):
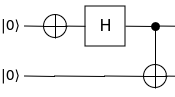
Circuit to create \(\ket{\Psi^-}\):
Now let’s code up the circuit to generate \(\ket{\Phi^+}\).
Import the Qristal core:
import qristal.core
Create a quantum computing session using Qristal:
my_sim = qristal.core.session()
Set the number of shots to run through the circuit:
my_sim.sn = 1024
Set the number of qubits:
my_sim.qn = 2
Choose the simulator backend:
my_sim.acc = "qpp"
Create the \(\ket{\Phi^+}\) component of the Bell state using Hadamard and CNOT gates:
my_sim.instring = '''
__qpu__ void MY_QUANTUM_CIRCUIT(qreg q)
{
  OPENQASM 2.0;
  include "qelib1.inc";
  creg c[2];
  h q[0];
  cx q[0], q[1];
  measure q[0] -> c[0];
  measure q[1] -> c[1];
}
'''
Run the circuit:
my_sim.run()
Print the cumulative results in each of the classical registers:
print(my_sim.results)
Installation
Qristal can either be run directly from the provided Docker image, or installed from source. This section provides instructions for working with the source. If using Windows Subsystem for Linux 2, ensure you have Docker Desktop installed on Windows and not under your Linux distribution, as it allows Docker to use WSL2 as a backend.
Dependencies
Installing Qristal from source requires the following libraries/packages to be installed:
GNU C++ Compiler >= 11.4.0. Usage of clang 16.0.6 or later is supported, but gcc/g++ is still required for building exatn and tnqvm.
GNU Fortran Compiler >= 11.4.0
CMake >= 3.20
Python >= 3.8
Boost >= 1.71
Also, note that Qristal will be built with support for CUDA Quantum if and only if cmake detects that your system has a compatible CUDA Quantum installation. A shortcut is to run Qristal directly from the Docker image that we provide with a compatible version of CUDA Quantum already installed.
Additional dependencies that can be installed automatically at build time:
pybind11 >= 2.10
Eigen >= 3.3.7
cpr >= 1.3.0
args >= 6.4.1
cppitertools >= 2.1
GoogleTest >= 1.12.1
Nlohmann JSON >= 3.1.1
Various Python modules.
Note
Automatic dependency installation
It is highly recommended that users let the Qristal build system install the additional dependencies mentioned above, by setting the -DINSTALL_MISSING=ON CMake option.
Installing from source
Automatic Dependency Installation
For development purposes, it is recommended to install Qristal using automatic dependency installation mode.
git clone https://github.com/qbrilliance/qristal.git qristal
cmake -B qristal/build -S qristal -DINSTALL_MISSING=ON
cmake --build qristal/build --parallel $(nproc)
cmake --install qristal/build # Default installs to the build directory which in this case is "qristal/build"
The -DINSTALL_MISSING=ON flag ensures that all missing dependencies (if any) will be downloaded and installed automatically. To automatically download and install only C++ dependencies, instead set -DINSTALL_MISSING=CXX. To download and install only Python module dependencies, use -DINSTALL_MISSING=PYTHON.
The required dependencies must be installed on your system. -DINSTALL_MISSING=ON will not handle those mandatory dependencies.
Other useful
cmakeoptions
The directory into which Qristal is to be installed can be specified by setting -DCMAKE_INSTALL_PREFIX=<YOUR QRISTAL INSTALLATION DIR>.
If you wish to build Qristal’s C++ noise-aware circuit placement routines, you must also enable the use of the additional dependency TKET. This is done by passing -DWITH_TKET=ON to cmake. TKET will be installed automatically by cmake if both -DWITH_TKET=ON and -DINSTALL_MISSING=ON (or -DINSTALL_MISSING=CXX) are passed to cmake.
If you also wish to build this html documentation, pass -DBUILD_DOCS=ON.
Manual Dependency Installation
Manual Installation of additional dependencies (Advanced alternative to step 1)
Follow the installation instructions of XACC, ExaTN and TNQVM.
Perform system-level installation of the remaining libraries.
Configure CMake build with
cmake .. -DXACC_DIR=<YOUR XACC INSTALLATION DIR> -DEXATN_DIR=<YOUR EXATN INSTALLATION DIR> -DTNQVM_DIR=<YOUR TNQVM INSTALLATION DIR>
In this manual mode, the build system will check for a specific version of XACC, EXATN and TNQVM as provided. If not satisfied, it will terminate the build and ask for a reinstallation of the dependency. Please follow the error message to install the correct version (specified as a git commit hash key).
Similarly, if building with noise-aware placement routines enabled using -DWITH_TKET=ON, you can pass -DWITH_TKET=ON -DTKET_DIR=<YOUR TKET INSTALLATION DIR> to cmake to tell it to use your own installation of TKET rather than building TKET from source.
MPI support
When using Qristal, enabling MPI allows the user to take advantage of multiple computing nodes to accelerate calculations. Workloads are partitioned across multiple processes, which are typically configured to run across different nodes via something like Slurm, and executed in parallel. The resultant data from each process is then synchronised. The implementation of MPI in the application or dependency determines how the work is partitioned, run and synchronised.
Qristal Native
To enable native MPI acceleration in Qristal, either add -DWITH_MPI=ON or -DMPI_HOME=<MPI install location> to the cmake configuration step. The default behaviour is to use whatever MPI installation has been installed to the system’s root directory. A custom MPI installation can be specified via -DMPI_HOME=<MPI install location>. For more fine-grained and customised control of MPI compiler, header and library locations to configure the build with, see the relevant section in the cmake documentation.
Qristal implements MPI acceleration by partitioning shots across processes. Once all MPI processes finish running their allocated number of shots, the supervisor MPI process synchronises and, where necessary, rescales the results of all processes before combining them with its own.
Qristal Dependencies
To enable MPI acceleration in Qristal dependencies, add -DENABLE_MPI_IN_DEPS=ON to the cmake configuration step. Enabling MPI acceleration for Qristal will not implicitly enable MPI acceleration within dependencies. When -DENABLE_MPI_IN_DEPS=ON is used, finding MPI is left up to the individual dependencies that support MPI.
Dependency support for MPI:
Parallelisation when using specific
xaccbackendstnqvmbackend when built withexatnbackend (which Qristal does)"hpc-virtualization"backendSee the
HPCVirtDecorator(“xacc/quantum/plugins/decorators/hpc-virtualization/hpc_virt_decorator.*”) class declaration (hpp) and definition (cpp) for more information
Circuit-level parallelisation for expectation value computation using the
VQEEoptimisation algorithm (uses the “hpc-virtualization”` backend)
Example Usage
cmake -B build -S . -DWITH_MPI=ON -DMPI_HOME=/opt/mpich -DCMAKE_EXPORT_COMPILE_COMMANDS=ON -DINSTALL_MISSING=ON
...
-- Found MPI_CXX: /opt/mpich/lib/libmpicxx.so (found version "4.1")
-- Found MPI: TRUE (found version "4.1") found components: CXX
-- MPI configuration:
    MPI_HOME: /opt/mpich
    MPI_VERSION:
    MPI_CXX_VERSION: 4.1
    MPI_CXX_INCLUDE_DIRS: /opt/mpich/include
    MPI_CXX_LIBRARIES: /opt/mpich/lib/libmpicxx.so;/opt/mpich/lib/libmpi.so
    MPI_CXX_COMPILER: /opt/mpich/bin/mpicxx
    MPI_CXX_COMPILE_DEFINITIONS:
    MPI_CXX_COMPILE_OPTIONS:
    MPI_CXX_LINK_FLAGS: -Wl,-rpath -Wl,/opt/mpich/lib -Wl,--enable-new-dtags
    MPIEXEC_EXECUTABLE: /opt/mpich/bin/mpiexec
-- MPI C++ compiler wraps the same compiler that's configured for this cmake project (/usr/bin/c++)
...
Note that MPI integration with Qristal assumes all “found” MPI directories and binaries are under the MPI_HOME directory and uses this to ensure cmake has not found an MPI install that is different to where the user has specified it to be. If this is not the case, the below error will occur:
-- MPI configuration:
    MPI_HOME: /opt/mpich
    MPI_VERSION:
    MPI_CXX_VERSION: 3.1
    MPI_CXX_INCLUDE_DIRS: /usr/lib/aarch64-linux-gnu/openmpi/include;/usr/lib/aarch64-linux-gnu/openmpi/include/openmpi
    MPI_CXX_LIBRARIES: /usr/lib/aarch64-linux-gnu/openmpi/lib/libmpi_cxx.so;/usr/lib/aarch64-linux-gnu/openmpi/lib/libmpi.so
    MPI_CXX_COMPILER: /usr/bin/mpicxx
    MPI_CXX_COMPILE_DEFINITIONS:
    MPI_CXX_COMPILE_OPTIONS:
    MPI_CXX_LINK_FLAGS:
    MPIEXEC_EXECUTABLE: /usr/bin/mpiexec
-- MPI C++ compiler wraps the same compiler that's configured for this cmake project (/usr/bin/c++)
CMake Warning at cmake/mpi_utilities.cmake:69 (message):
    /usr/lib/aarch64-linux-gnu/openmpi/include is not a child of /opt/mpich.
Call Stack (most recent call first):
    cmake/mpi_utilities.cmake:20 (check_mpi_configuration)
    cmake/dependencies.cmake:198 (add_mpi)
    CMakeLists.txt:31 (include)


CMake Warning at cmake/mpi_utilities.cmake:69 (message):
    /usr/lib/aarch64-linux-gnu/openmpi/include/openmpi is not a child of
    /opt/mpich.
Call Stack (most recent call first):
    cmake/mpi_utilities.cmake:20 (check_mpi_configuration)
    cmake/dependencies.cmake:198 (add_mpi)
    CMakeLists.txt:31 (include)


CMake Warning at cmake/mpi_utilities.cmake:69 (message):
    /usr/lib/aarch64-linux-gnu/openmpi/lib/libmpi_cxx.so is not a child of
    /opt/mpich.
Call Stack (most recent call first):
    cmake/mpi_utilities.cmake:20 (check_mpi_configuration)
    cmake/dependencies.cmake:198 (add_mpi)
    CMakeLists.txt:31 (include)


CMake Warning at cmake/mpi_utilities.cmake:69 (message):
    /usr/lib/aarch64-linux-gnu/openmpi/lib/libmpi.so is not a child of
    /opt/mpich.
Call Stack (most recent call first):
    cmake/mpi_utilities.cmake:20 (check_mpi_configuration)
    cmake/dependencies.cmake:198 (add_mpi)
    CMakeLists.txt:31 (include)


CMake Warning at cmake/mpi_utilities.cmake:69 (message):
    /usr/bin/mpiexec is not a child of /opt/mpich.
Call Stack (most recent call first):
    cmake/mpi_utilities.cmake:20 (check_mpi_configuration)
    cmake/dependencies.cmake:198 (add_mpi)
    CMakeLists.txt:31 (include)


CMake Warning at cmake/mpi_utilities.cmake:69 (message):
    /usr/bin/mpicxx is not a child of /opt/mpich.
Call Stack (most recent call first):
    cmake/mpi_utilities.cmake:20 (check_mpi_configuration)
    cmake/dependencies.cmake:198 (add_mpi)
    CMakeLists.txt:31 (include)


CMake Error at cmake/mpi_utilities.cmake:75 (message):
    Configuration will not continue as the found MPI implementation is not
    under the configured MPI_HOME (/opt/mpich).
Call Stack (most recent call first):
    cmake/mpi_utilities.cmake:20 (check_mpi_configuration)
    cmake/dependencies.cmake:198 (add_mpi)
    CMakeLists.txt:31 (include)

-- Configuring incomplete, errors occurred!
Contributing
There are many ways in which you can contribute to Qristal, whether by contributing some code or by engaging in discussions; we value contributions in all shapes and sizes!
Here are some ideas for how you can get involved.
Asking Questions
Have a question? Some concepts are hard-to-understand?
Please feel free to file an issue to ask your questions here.
Your question will serve as resource to others searching for help.
Reporting and Discussing Issues
If you have feedback about Qristal, please let us know by filing a new issue!
When filing a bug report, please follow the below template:
# [Title]
A concise but specific description of the bug.

### Steps to reproduce
Describe what needs to be done to reproduce the faulty behavior.

### Resulting and expected behavior
A brief description of what you expected and what you actually got.

### Self help
If you found a workaround or tried to fix the bug yourself, please provide your attempt here.

### Technical output
If available, provide a traceback, logs or similar. Console output is helpful here.

### Screenshot
If applicable and helpful, provide a screenshot.

### System information and environment
- Software version:
- Operating system:
We also encourage you to look at the list of currently open issues to share your ideas and expertise.
Contributing Code
Before submitting a new pull request, please make sure to do the following:
Include a unit test for any new routines or features. If you’ve fixed a bug or added code that should be tested, add a test to the
testsdirectory.Ensure that the test suite passes, e.g., by running the
CITestsexecutable. This will also be checked by our CI when the MR is submitted.Fix (not suppress) any warnings generated by your changes. You can turn warnings on in the code by passing
-DWARNINGS=ONtocmake.
When ready, submit your fork as a pull request to the QB GitHub repository, filling out the pull request form.
When describing the pull request, please include as much detail as possible regarding the changes made/new features added/performance improvements. If including any bug fixes, mention the issue numbers associated with the bugs.
Once you have submitted the pull request, the CI pipeline will automatically run to ensure that all tests continue to pass.
We may ask for changes to a pull request if it requires more documentation or unit tests to better make use of it.
Last but not least, thank you for taking the time to contribute.